
I found this method works well for me. It
enabled me to place my text very accurately and I was also left with a template
that I could use again and again.
The resulting postmark will be close to an
inch in diameter at 300 ppi but can easily be enlarged or reduced without
degradation.
*************************************************************
New image white raster background 400 X 400
at 300 ppi
Turn on grid [View Grid] set at 50 pixels
vertically and horizontally
Select Ellipse tool> circle Background
null, Foreground Black #000000 Line width 3 pixels and draw a circle starting
with your cursor at 50, 50 and ending at 350, 350 Check that the circle is
centred.

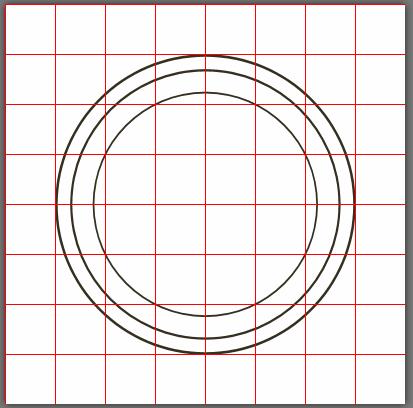
Edit> Copy this
layer. Edit> Paste as a new layer and Image resize [all layers unchecked]
90%
Objects > Convert
to path. Rename layer Circle one.
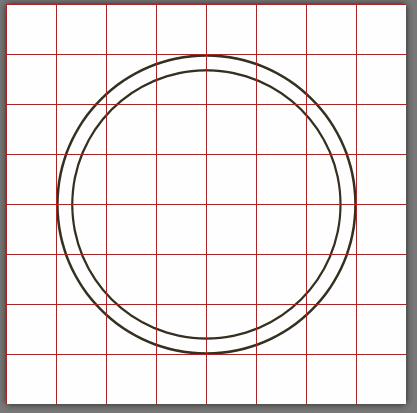
Image resize 75% and again convert to path.
Rename Circle two.
Make sure your uppermost layer [smallest
circle] is selected and choose your text tool.
Foreground null and background black #000000.
Find a suitable Font, size 35-36. A
Blocky fonts work best. I used Bodini MT with alignment centre.

Make sure also that your text "Offset Setting" is set at 0. [Often this setting is obscured on the extreme right hand side of the toolbar.]

Place your cursor as close to "12 o'clock" as you can.


Now return to the first inner circle [Circle
one] on the layer below and making sure that the circle layer itself is
selected use your pen tool to edit the path to go in an anticlockwise
direction. Right click and "Reverse Path"


Select text tool and with cursor in "6
o'clock" position type text using the same settings. Zoom in and carefully
centre as before. [The text will slide into position nicely]


Now turn off the visibility of both inner
circles:

New Vector Layer and print time and date in
the Centre:

You can make sure it is centred perfectly by
Objects>align> centre in canvas.
This is how it will appear on a printed page
at 300ppi:

Save your image as a .pspimage and then you
can edit size and any of the text and materials as you wish. I suggest that you use an installed font if you do so.
I
usually prefer a grungy look when using in an image – achieved by using
materials with texture.


I also like using a cancellation stamp as a
label :) – it is very adaptable J


1 comment:
Thanks Judy, looks like a great tutorial, I will certainly have to try it!
Post a Comment